Do you want to create your first Wikipedia article but don’t know where to start? How do you go about it practically?
I break down how I created a Wikipedia article to guide you!
This guide applies no matter the topic of the page you want to create: artist, author, entrepreneur, company, event, athlete, publishing house, politician, scholar, lawyer, concept, media personality, book, etc.
Plan
🚨 The Two Essential Prerequisites
Before you start creating your article, there are two things you need to do.
First, make sure that the topic of the page you want to create meets Wikipedia’s eligibility criteria.
Next, gather all the sources that cover the topic: press articles, TV appearances, radio broadcasts, encyclopedias, traditionally published books, well-known online media, scientific or academic literature.
All information in the article must come from these sources. You cannot add any information that is not documented elsewhere.
You also cannot rely on the website of the person, company, artist, publisher, or media outlet you’re writing about—no matter how tempting. Wikipedia may consider this self-promotion or an unreliable source.
👀Check your eligibility on Wikipedia with a notability audit
Request a comprehensive audit from us to determine your eligibility on the encyclopedia (delivered within 48 hours) or learn about alternative options that may be more relevant for your situation.
Access your draft on Wikipedia
I advise you to start writing your article directly on Wikipedia, rather than copying and pasting from a word processor.
You’ll save precious time formatting the text. And you can save your draft as you go along, without it being officially published.
To do this, you need to log in to your Wikipedia account. Or create one if you don’t already have one – it’s quick and free.
Then click in the top right-hand corner on 👤 > Draft.

You will then arrive at a page that looks like this:
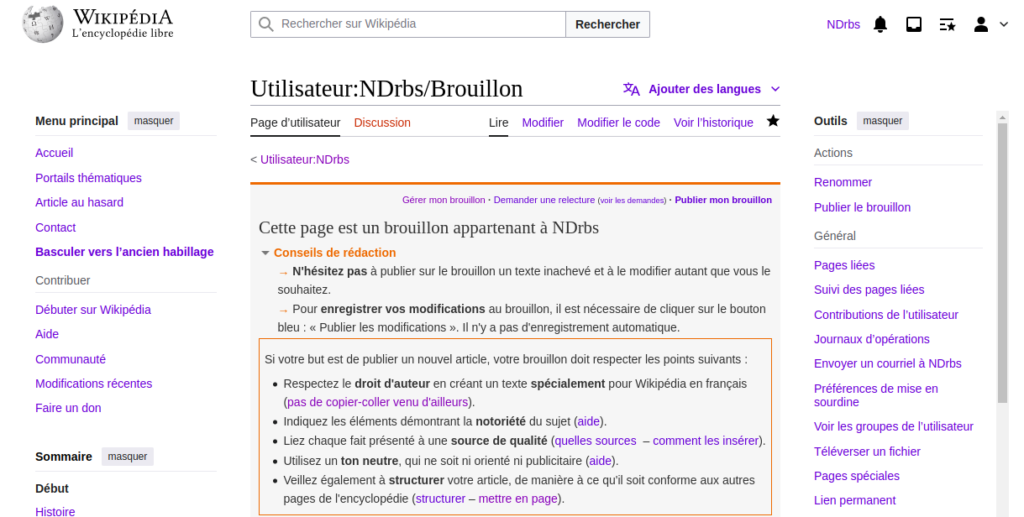
Then click on “Modify” at the top. This will appear:
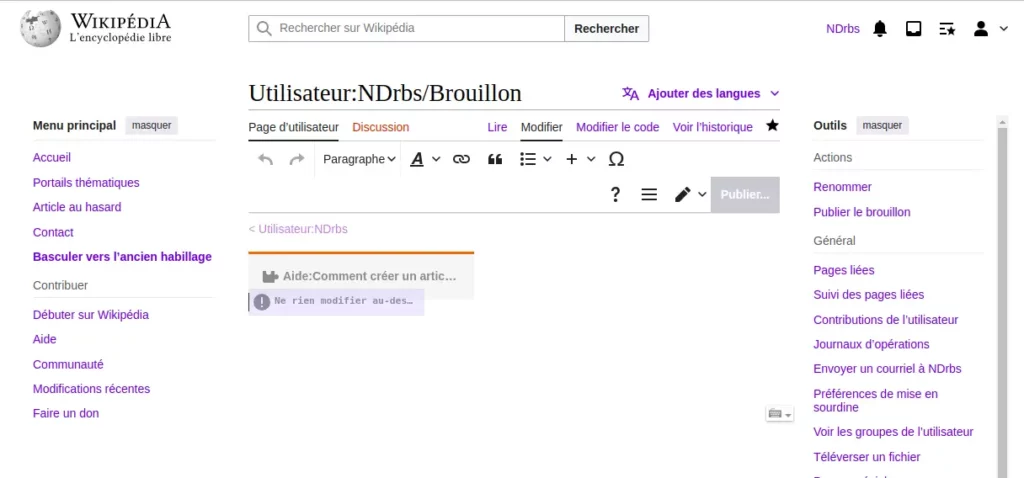
Click on “Do not modify”: you can now start writing the content!
Write the introduction to the article
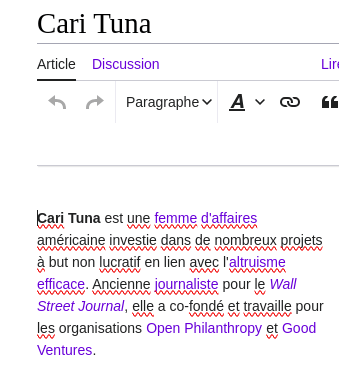
Start by writing the name of the future page and put it in bold. This is how all Wikipedia pages should start.
Then write a few sentences that summarize the gist of the full article that follows. You can come back to this later if you need to.
Already format this text to Wikipedia’s expectations: make internal links to other Wikipedia pages related to the topic:
- select the word on which you want to link to another Wikipedia page:
- click on the icon 🔗 ;
- enter the page name in the search bar that appears;
- the word will then appear in a different color.
This part should not contain any sources, as it is a synthesis of the body of the article in which the sources will appear.
📋 Case study: in my case, I started by writing Cari Tuna, the name of a businesswoman known in particular for her involvement in the effective altruism community. Then I wrote 2 synthetic sentences to introduce her.
Build the body text
Then complete the rest of the article according to Wikipedia’s guidelines.
The more media or academic sources there are talking about the subject of your page, the longer and more multi-part it will be.
Conversely, if there is little external documentation, your article will probably consist of a single part:
- Biography: if a person.
- History: if it’s a company.
Don’t forget :
- add internal links to other Wikipedia articles;
- source each affimation by adding a source.
To get a concrete idea of the type of information to include and Wikipedia’s style (encyclopedic and as neutral as possible), I recommend you take inspiration from a quality-labeled Wikipedia article. You’ll find a list here.
At the end of the article, you should also add an end-of-page section with :
- inserted notes and references, using a template ;
- related articles, if any ;
- external links, if relevant ;
- categories and portals.
📋 Case study: for Cari Tuna, I created 2 sections: Training & Career and Private Life. I also added several categories and portals related to her activities.

✍️ Delegate the creation of your Wikipedia page
Leverage our 12+ years of experience with the encyclopedia to save time and maximize your chances of success.
Add an infobox
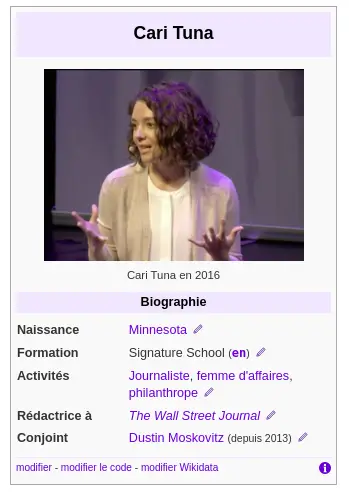
Wikipedia articles must contain an infobox that summarizes the essential information. The type of infobox to add depends on the subject of your article.
Here again, take inspiration from a quality-labeled article to find out what type of infobox to use!
For a company page: company infobox.
For a person’s page: infobox biography2.
Then fill in all the sections that seem relevant to you.
Infoboxes are inserted by going to Template > + > type “infobox” in the search bar.
To add photos and logos, you must first add them to Wikimedia, in compliance with strict copyright rules.
📋 Case study: I’ve added the biography2 infobox template to Cari Tuna’s page.
Submit article for review or publish
Once the item has been finalized, you can :
- click on Publish my draft: your article will go online straight away. But robots and people on Wikipedia will pass over it to check the admissibility of the subject and the quality of the article;
- click on Request proofreading: volunteer Wikipedians will proofread your article and tell you what you need to change/delete before it can be published.
If you’re not used to contributing to Wikipedia, a proofreading request is more suitable. This may help you avoid your article being deleted as soon as it goes online or after a few days, as it is much more complicated to republish a wikipedia article that has already been deleted.
📋 Case in point: I published Cari Tuna’s article directly, since I’d already created several undeleted pages on Wikipedia.
🤓Train your team to manage Wikipedia the right way
Hands-on workshops designed for communication, PR & marketing teams.
Delivered live online – build lasting in-house expertise.
Declare any links of interest you may have with your company: friendships, remuneration, etc.
If you have a link to the subject of your article, you must declare it in at least one of these 3 places as soon as the page goes online:
- on your Wikipedia profile;
- on the discussion page of the newly created page;
- when you ask for your page to be proofread or when you put it online in “Describe what you’ve changed”.
This is the case, for example, if the Wikipedia page is about yourself, someone in your family or business, a customer, etc.
Wikipedia allows contributions from people directly related to the topics of the pages. To do so, however, you must comply with the rules governing what are known as paid contributions (even if you are not directly paid for doing so).
Many agencies or communications managers prefer not to declare their link with the page’s subject for fear that this will increase the risk of it being removed. In my experience, doing so exposes you to even more risks, including having this type of unsightly banner permanently displayed at the top of your page: “This article may have been modified (or even created) in exchange for undisclosed compensation or benefits”.
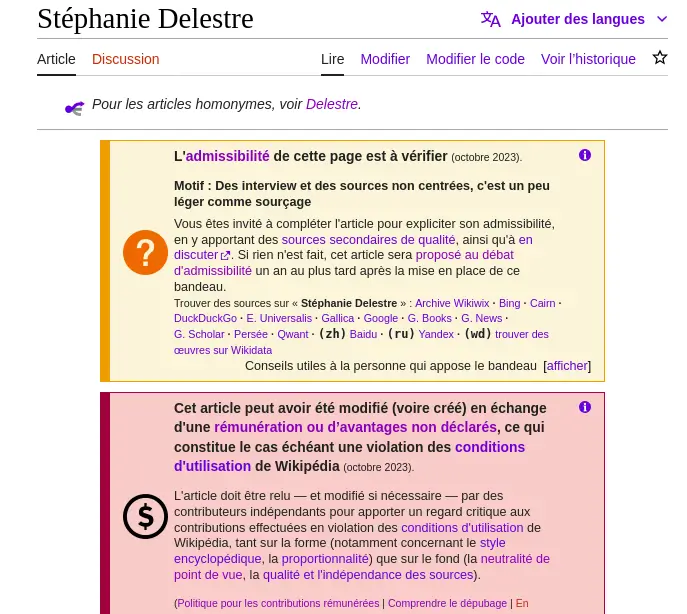
📋 Case study: I have no direct or indirect connection with Cari Tuna, other than being a supporter of the effective altruism movement. So I haven’t declared any links of interest. However, I do so systematically for pages created for my clients, in the 3 recommended places, notably on my user page.
I hope you’ve found this article useful! If you have any questions, you can leave them as a comment – I always answer everyone that way.
If you’d like me to accompany you on Wikipedia, please contact me for a quote or to find out more about the services I’ ve already provided.
Good contributions 🙂 !

Written by Albin Guillaud
A Wikipedia contributor since 2014, with Wikiconsult I support businesses, institutions, public figures, and agencies looking to create, update, or monitor their presence on Wikipedia.